
Part 1: Seed starting
Vernon Bush has enjoyed the beauty of native azaleas since childhood. The profusion
of pink blooms every spring lent their beauty to the woods surrounding his family home
in Mississippi. When he moved to Huntsville in 1961, he told his mother he wanted
some of her plants for his new home. She told him they would not transplant well. Boy
did he prove her wrong! On a visit to his brother he saw a glorious golden blooming
native azalea, a color he had not seen before, and the spark grew. Since his retirement
in 1996 from a long and prosperous career as an Aerospace Engineer, he has selflessly
dedicated his time to the planting and cultivation of native plants and wildflowers.
Vernon propagates and preserves rare and endangered plants at the Huntsville
Botanical Garden, Huntsville, AL and Jackson County Park in Scottsboro, AL. While he
does propagate many herbaceous native plants, his specialties are native azaleas and
rhododendrons.
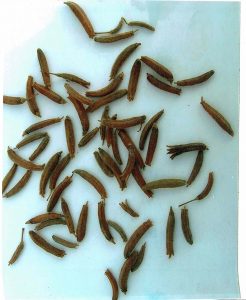
Seed Pods
When Vernon was getting started, he tried the procedures practiced by Mike Creel, Jeff R. Jones, Anthony V. LeBude, Thomas G. Ranney, Earl Sommerville, and Pete McNees. While he had success with the methods developed by these men, he has since developed his own methods with fantastic results! The following are his tried-and-true methods for azalea propagation.
For seed propagation of native azaleas, seed pod collection should be done in November and December as pods turn brown and begin to split at the ends. They should then be stored in a paper bag at room temperature for two to three weeks until the pods are dry. At this point, you should crack the seed pods using pliers or your hand and store another two weeks to allow the pods to complete opening. Separate the seed hulls from the seed pods with a wire sifter, and store them in an envelope with all edges sealed.
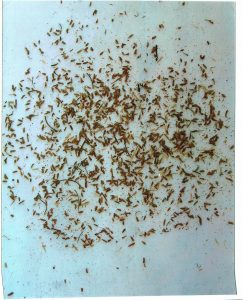
Seeds
To prepare the seed planting container, it should be sterilized with a Clorox solution at nine (9) parts water to one (1) part Clorox, rinsed and dried. For the bottom layer, you will place ¼ inch of soil conditioner; this will have fine pine bark in it for drainage. The middle layer is 1 inch of your growing medium. Vernon uses an acidic potting soil. Water these ingredients to moisten, and then add 1/8 inch of pre-moistened peat moss and gently tamp to level. Now you are ready to plant the seeds!
Cut an opening at one end of your seed envelope, while over your planting container, and begin gently tapping the envelope while moving it to spread the seed as evenly as possible.
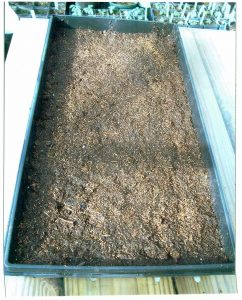
Seeds on planting medium
Do not cover the seeds with soil – they need light to germinate. Using a quart hand sprayer with a fine mist, mix water with 1/2 teaspoon of Ortho Garden Disease Control (fungicide). You should spray the seed and peat moss until thoroughly wet. Be warned that the seeds can be easily propelled from the surface of the container by a strong spray.
When finished, move the seed container to the germination area. A fluorescent light needs to be positioned about one foot above the seed container, and must illuminate the seeds for at least sixteen hours per day. The container requires misting two to three times per day. Do not allow the seed to become dry. Every week, you should apply the fungicide spray that was applied at planting. Utilizing a heat mat set at 70 degrees under the seed container will aid germination if ambient temperature is below 70 degrees. The seeds are expected to germinate within two weeks at 70 degrees, longer if less than 70 degrees.
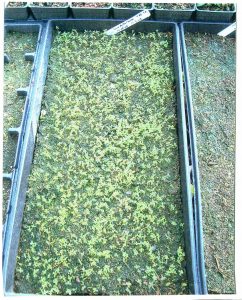
Sprouted seedings
When the seedlings have developed at least two sets of true leaves, they are ready to be transferred to a 72-cell plug tray. They will stay in the tray until the roots reach the walls of the cell. Then the plants can be transferred to 3-inch pots. When the roots reach the walls of this container, they are ready to go into larger containers.
The seedlings must be kept watered regularly, while fertilizer should be applied every ten to fourteen days in the growing seasons. Fertilizer should not be applied after July. Vernon uses Miracle Grow Azalea, Camellia, and Rhododendron fertilizer at the rate of one teaspoon per gallon of water.
Be prepared for this long-term project. The time from planting seeds to blooming plants is four to five years, but the range of colors you will have to plant and share are well worth the wait.
Be prepared for this long-term project. The time from planting seeds to blooming plants is four to five years, but the range of colors you will have to plant and share are well worth the wait.
1). Nature Is My Greenhouse: Let’s Simply Propagate by Mr. Mike Creel
2). Vegetative Propagation of Oconee Azalea (Rhododendron flammeum) by Stem Cuttings and Mound Layering by Jeff R. Jones, Anthony V. LeBude, and Thomas G. Ranney
3). Propagating Native Azaleas by Earl Sommerville4). Propagation of the Genus Rhododendron by Pete McNees
4). Propagation of the Genus Rhododendron by Pete McNees
Part 2: Starting cuttings
Softwood cutting propagation of native azaleas needs to occur from mid-April until the end of May. Before taking cuttings, you need to have your rooting box and rooting medium prepared and ready to receive them. The box should be a clear plastic bin with a clear lid. Vernon uses bins that are approximately twenty four inches long x eighteen inches wide x fourteen inches deep. Ideally, you would use a soldering iron with around tip about the diameter of a pencil to melt holes in the bottom of the box and up three inches on the sides, so do this prep work in a well-ventilated area and avoid breathing the fumes. A sharp drill bit may work, but is likely to break or crack the plastic. The lid will also need a 3/4″ hole added to its center using a spade bit. Place the lid on a wooden surface to prevent the plastic from splitting. The rooting medium will consist of one part sphagnum peat moss and two parts coarse perlite. Follow the handling instructions for the perlite. Mix them well, moisten, and place in the prepared bin.
You will be taking cuttings from active growth, with green stems, early in the morning after a rain or heavy fog. Your pruners need to be nicely sharp to take 4-6-inch cuttings from healthy, well-watered plants. You will notice that each new burst of growth will usually produce two to five or more new shoots, so cuttings should be taken from stems with more than two shoots. Avoid collecting large diameter shoots, these are water sprouts. Place your cuttings in a plastic zip-lock bag with a moist paper towel, and avoid crushing the bag. If you are not going to be planting the cuttings immediately, you should have a cooler with ice to keep them safe. Cuttings may be refrigerated for up to forty-eight hours if necessary.
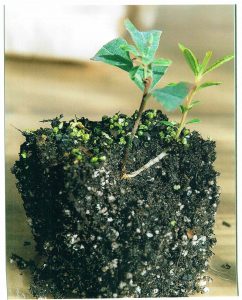
Transplant with cut leaves
When preparing to stick the cuttings, you should check the bottom of the stem for bruising and use a sharp single edge razor blade to trim the stem at an angle. Remove the terminal bud at the tip of the stem, if it is present, as well as all but four or five leaves. The remaining leaves will need to be cut in half to reduce the surface area with the razor blade. The bottom 1/2-1 inch should be gently wounded on opposite sides of the stem and quickly dipped in a fungicide/insecticide solution of Ortho Garden Disease Control and Malathion at a rate of 1/4 teaspoon of each in a pint of water. Use a pencil to insert a hole into the rooting medium, dip the bottom end of the cutting in the rooting hormone (1% IBA or Dip+Grow) and insert the stem into the hole in the rooting medium. Gently tamp the medium around the stem for good contact and to support the stem. Spray the cutting with the fungicide solution (1 tsp fungicide /1 qt. water) paying special attention to the base of the cutting. This step is intended to be done to each cutting as it is placed in the soil. Continue these steps with each cutting. Once all of your cuttings are placed in the rooting medium, spray all the cuttings and the wall of the rooting container box with the fungicide solution. Place the lid on the rooting box and close the hole in the lid with a rubber or cork stopper.
Place the rooting box under a fluorescent light for sixteen hours per day. The cuttings will need to be misted two to three times a day with water, and condensation should be present on the walls and top of the box indicating 100% humidity. Spray the cuttings once per week with the fungicide.
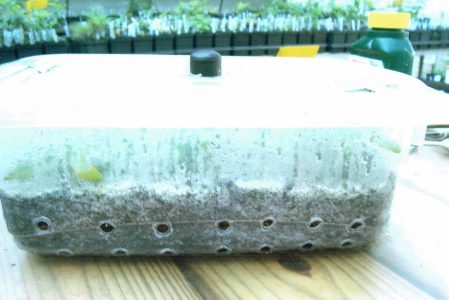
Rooting bin
The cuttings should begin rooting in four to six weeks. Test for rooting by gently tugging on the stem. You will feel resistance and soil around the cutting will lift upward as the cutting roots. After the cuttings begin to root, watering can be reduced and you can begin fertilizing every seven to ten days with Miracle Grow Azalea, Camellia, and Rhododendron fertilizer at the rate of one teaspoon per gallon of water. To harden off the cuttings, simply remove the plug from the lid. If the cuttings wilt, reinstall the plug. Repeat this process until the lid can be removed. The cuttings should be left in the rooting box for one year before transplanting to individual pots.
To remove the rooted cuttings from the box, use a sharp knife to cut a plug of rooting medium around each new plant, and then gently remove the small root ball with a pair of tongs and transplant into a quart container. It is best to let this new plant get some new growth before going dormant in the fall. The new plants should be overwintered in a cold frame to protect their young root systems.
It should be noted that cuttings taken from plants which were cuttings themselves will root easier, and cuttings taken from young plants root easier than cuttings taken from old plants. Rhododendron austrinum roots easier than other species and some species are just very difficult to root.

Transplant
Vernon has had great success with these low-cost methods of propagation, effectively reducing time to first flower substantially over the industry standard. He uses this low-tech method to propagate about 2000 cuttings every year in his rooting boxes. The fruits of his labors are used throughout the Bush Azalea Trail at the Huntsville Botanical Garden and on The Vernon Bush Trail at Jackson County Park, in Scottsboro, Alabama. Vernon also places many of his azaleas in the Huntsville Botanical Garden Plant Sale, so you can start your own native azalea garden if you don’t want to wait!